Connecting to the Robot
The Magni robot is normally running all the software for whatever sensors and navigation mode you are using for your project but there is no practical way to see what the robot is doing within ROS because the Host Linux cpu running the Magni itself is headless and normally only has WiFi to access.
As such you’ll need at least SSH access to use the robot properly which will be explained here, for more advanced ROS connectivity check the workstation setup.
WiFi Hotspot
If you have received a Magni with the Raspberry Pi already installed, or loaded the default Raspberry Pi image, the robot will boot up in WiFi Access Point mode. This is a WiFi mode which provides its own network to which you can connect your machine. The SSID (network name) is usually ubiquityrobotXXXX where XXXX is a number letter combination. You should find it under network list; the password (sometimes called the security key) to connect is robotseverywhere. If you can’t find it under available networks, try restarting the robot.
There is a WIFI status led on the large MCB board if it is rev 5.2 later. The MCB WIFI led is located on the right middle height of the MCB. There is also this WIFI led on the optional sonar board however which does brief blinks ON at same rate. The table below shows WiFi status indications for the led on the MCB which is mostly on with short blinks off at rates shown in the table.
| Blink Rate | WiFi Status |
|---|---|
| 2 per sec | WiFi is being initialized after a startup or reboot |
| 1 per sec | WiFi is operating as an Access Point (AP) and ready to be connected to by a laptop or phone |
| 1 per 2 sec | WiFi has successfully connected to your own WiFi ssid setup already |
SSH Console
Once you are on the robot’s network, via WiFi Or Wired, you can connect to the robot itself. If using a linux computer, start a terminal window (Linux shortcut: ctrl-alt-t). In that window, log in by typing
ssh ubuntu@ubiquityrobot.local
The password initially is set to “ubuntu”.
If you have trouble using ubiquityrobot.local, use the IP address, 10.42.0.1 instead. In some environments, this works better.
You may see:
The authenticity of host ‘10.42.0.1 (10.42.0.1)’ can’t be established.
ECDSA key fingerprint is SHA256:sDDeGZzL8FPY3kMmvhwjPC9wH+mGsAxJL/dNXpoYnsc.
Are you sure you want to continue connecting (yes/no)?
Answer yes
Failed to add the host to the list of known hosts (/somepath/.ssh/known_hosts).
Ignore that. You will be asked for the password, which initially is “ubuntu”.
ubuntu@10.42.0.1's password:ubuntu
Now you are connected and logged in.
The process should be similar in a Mac Terminal and in PuTTY on Windows.
Doing a clean Shutdown Of the Magni Robot
Congrats, you should now have SSH access to the robot. This means you can now shutdown the Pi properly to avoid the chance of corrupting the file system.
You can shutdown the Magni in a clean way using these commands and actions:
- Turn off the motor power by releasing the red ESTOP switch on the right and the RED motor power led will go off.
- In a SSH console session type
sudo shutdown -h now - After the green light on the Pi stops flashing turn off the main power using the BLACK switch (usually less than a minute)
If your Magni is a Magni silver and you have the sonar board you can always use the SW1 switch by holding it down for a couple seconds. This will lead to a clean shutdown of the host Raspberry Pi CPU.
If you do not have the sonar board the pins to the 50 pin P702 are available to be connected to with push on connectors common for prototype uses. Many users make their own shutdown button with one wire to pin 31 and one wire to pin 30. Note that for P702 pin 1 is on the far left and the bottom row of pins. These jacks have odd number pins on bottom and even starting with 2 on top row.
Connecting the robot to your local network
Of course, as the robot is delivered it has no connection to your local network. Because of this, the robot has its own network (called an access point or “AP mode”) that enables you to connect to it directly, as described above. For example, you can drive the robot with our old Android Robot Commander app. You can use AP mode to connect directly to the robot from a workstation, to run ROS commands such as keyboard teleoperation.
However, in AP mode, the robot cannot access the Internet. This is what we’ll be fixing in this section.
By default the robot is configured to use the WiFi channels used in the United States. Countries that use WiFi channels on their WiFi router that are not part of the normal channels used in the US will need to set their country code which is explained later or the robot may not see their WiFi router.
Before you go on, you should change the hostname of your robot, to distinguish your robot from others. In the interests of security, you can change the user password. Just type:
passwd
and follow the prompts.
To change the hostname you can use pifi. Type the command:
sudo pifi set-hostname NEWHOSTNAME
Note: “sudo” is a Linux command that allows administrative actions.
Linux will often ask you for your password (it’s “ubuntu”, if you haven’t changed it) when you use sudo (sudo stands for Super-User DO).
If you now reboot the robot the new hostname will be used
sudo reboot
Now you can log in to the robot with NEWHOSTNAME:
ssh ubuntu@NEWHOSTNAME.local
Use pifi to list the nearby networks:
pifi list seen
If you are sure you have a WiFi router that should be seen but it does not show up it may be due to the router using a WiFi channel that is not used in the United States which is the default country code on our images. We are implementing a way to set the country code that will be available in late 2020 where below we set China country code. Refer to www.iban.com/country-codes or other reference.
sudo pifi set-country CN
MyNetwork
Neighbor’s network
Other Network
We want to switch to MyNetwork, and we have now verified that it’s present. So we can command:
sudo pifi add MyNetwork password
NOTE: MyNetwork is SSID and password is password of your wireless network. You may need to put the SSID and password in quotes.
Now reboot the robot again.
sudo reboot
The robot will reboot and try to attach to the “MyNetwork” wifi network, if succesful the AP mode will be closed and the robot will now remain connected to your network. Connect your workstation to “MyNetwork” to continue. If something goes wrong here, the robot should come back up in Access Point mode–that is, on the network named ubiquityrobotXXXX. Reboot everything and start over.
Now you have two options: contact the robot via its hostname (if it resolves correctly on your network) or by it IP.
To test,
ping NEWHOSTNAME.local
The ping result shows the network address of the robot:
PING NEWHOSTNAME.local (10.0.0.113) 56(84) bytes of data.
64 bytes from 10.0.0.113: icmp_seq=1 ttl=64 time=97.6 ms
64 bytes from 10.0.0.113: icmp_seq=2 ttl=64 time=5.70 ms
Press control-c to stop the pinging.
If the former doesn’t work, see the section below on how to find the IP address and use that instead.
Now ssh into the robot.
ssh ubuntu@NEWHOSTNAME.local
As before:
The authenticity of host ‘10.0.0.113 (10.0.0.113)’ can’t be established. ECDSA key fingerprint is SHA256:sDDeGZzL8FPY3kMmvhwjPC9wH+mGsAxJL/dNXpoYnsc. Are you sure you want to continue connecting (yes/no)?
yes
ubuntu@10.0.0.113’s password:
ubuntu
There is some housekeeping that you can perform at this point as you now have internet access from the robot. Begin by checking the date.
date >Mon Aug 14 17:16:26 UTC 2017
Now that you have the correct date you can update the robot to get changes that have been made since the robot was manufactured.
sudo apt-get update

sudo apt-get upgrade
Finding The IP Address
A common problem that comes up is to find the IP address of the robot when it is not acting as the Access Point (AP) that you connect to from your workstation or other device. If you’ve connected your robot to the access point it’ll continue to connect to your network after each boot. If your network as DHCP set up, your robot may not get the same IP every time, so you’ll need a way to find it.
When the robot sets up it’s access point and you connect to its WiFi the IP address of the robot will always be 10.42.0.1 So after you connect to the Robot Access Point (its network) you always can use ssh directly using an IP address like this:
ssh ubuntu@10.42.0.1
Finding the IP address on your network
If the Magni connected to ‘mynetwork’ it will no longer present an ‘access point’ for its OWN network because it only has one wlan adapter which can connect to (or create) one network at a time. The Magni either uses the Pi wifi to present it’s AP, or if it is told to join your network it simply joins and gets an IP address from YOUR network access point (normally this is some Wifi Router that connects to the outside Internet.
So IF the Magni connects to your Wifi with your unique SSID (network name) the magni will be on your own network, likely with an unknown IP set by the router DHCP.
Option 1: Network Scanner
What you then must do is have some OTHER device like laptop or Windows machine or an android phone and then have a tool on that device to ‘SCAN’ and show you the IP address of the Magni.
Some scanning software will say it is a Raspberry Pi and some will say the name on the network but all will show the IP address. There are many network scanners, I am just going to mention a few.
Windows
For Windows we suggest using the ‘Advanced IP Scanner’. Once installed, IF your windows machine is also on the same wifi of ‘mynetwork’ you just hit ‘SCAN’ and look for any raspberry Pi or look for hostname like ubiquityrobot to find it’s IP address that your own router assigned to it on your network.
Android
If you have an android phone you can connect your phone to ‘my network’ and then use an IP scanner such as ‘Fing’ available on google Play Store. This too will scan your network IF the android phone is in this case connected to ‘mynetwork’. Look for a raspberry pi with the hostname you’ve given it.
Linux
If you connect a linux laptop to ‘mynetwork’ you may then use ‘iwconfig’ to look up your first 3 numbers of your IP address and then use ‘arpscan’ so this is the most ‘unfriendly’ method but it does work. Lets say you connect your Linux Laptop to the same network SSID (name) you told PiFi to connect to. Lets say you run ‘iwconfig’ and it tells you your WIFI IP starts with 192.168.1.x where x is just what you ended up with and is a number from 1 to 253 or so. We need the first 3 numbers in our command so to run the Linux scan this would be the command
sudo arp-scan 192.168.1.1/24
Option 2: Your Router
If you have access to your router it may be simplest to just log into it via your browser of choice at 192.168.1.1, and check the DHCP lease list which should contain your robot IP and its hostname, among other devices on your network.
Option 3: OLED Display
Starting in late 2020 we had formed host software to drive a low cost OLED display that is usable on rev 5.2 or more recent MCB boards. If you happen to have one and are using an up to date image, you should be able to view your IP on the display itself.
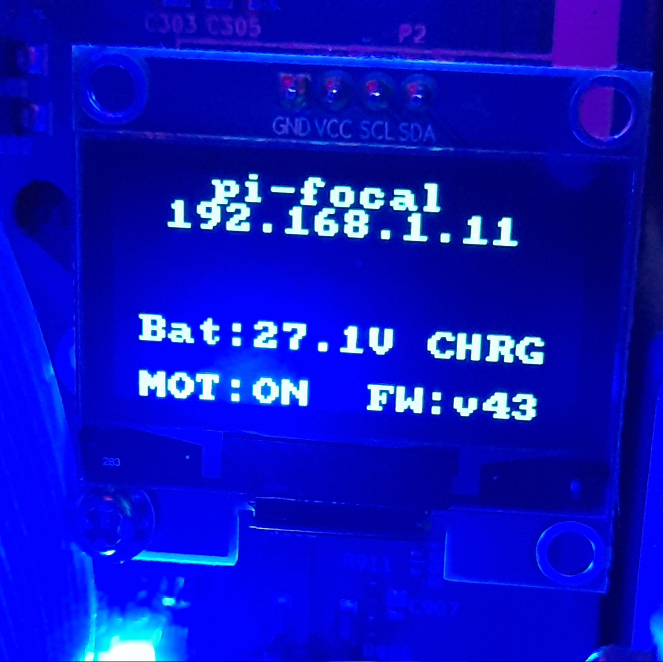
The display also shows other data:
- hostname
- wlan0 IP (blank if not active)
- eth0 IP (blank if not active)
- battery voltage and percentage
- motor status and firmware version