Pi Camera Module V2
When changing out sensors makes sure to disconnect the RED battery cable from the batteries and wait 2 minutes so high voltage and current are not linked with the main board!
Installation
The Raspberry Pi camera can be mounted and configured to work in different orientations. From the start of the Magni robot there have been 2 popular orientations. The forward camera mounting points forward but also tilts up about 20 degrees. This enables Magni to view things in front such as fiducials in the Fiducial Follow application. When the robot is to be navigating in a space with fiducial patterns on the ceiling the upward mounting is used.
Other postions include downwards which corresponds to the tower+shell setup and has the camera pointing down to see floor markers, and ahead which points straight forward.
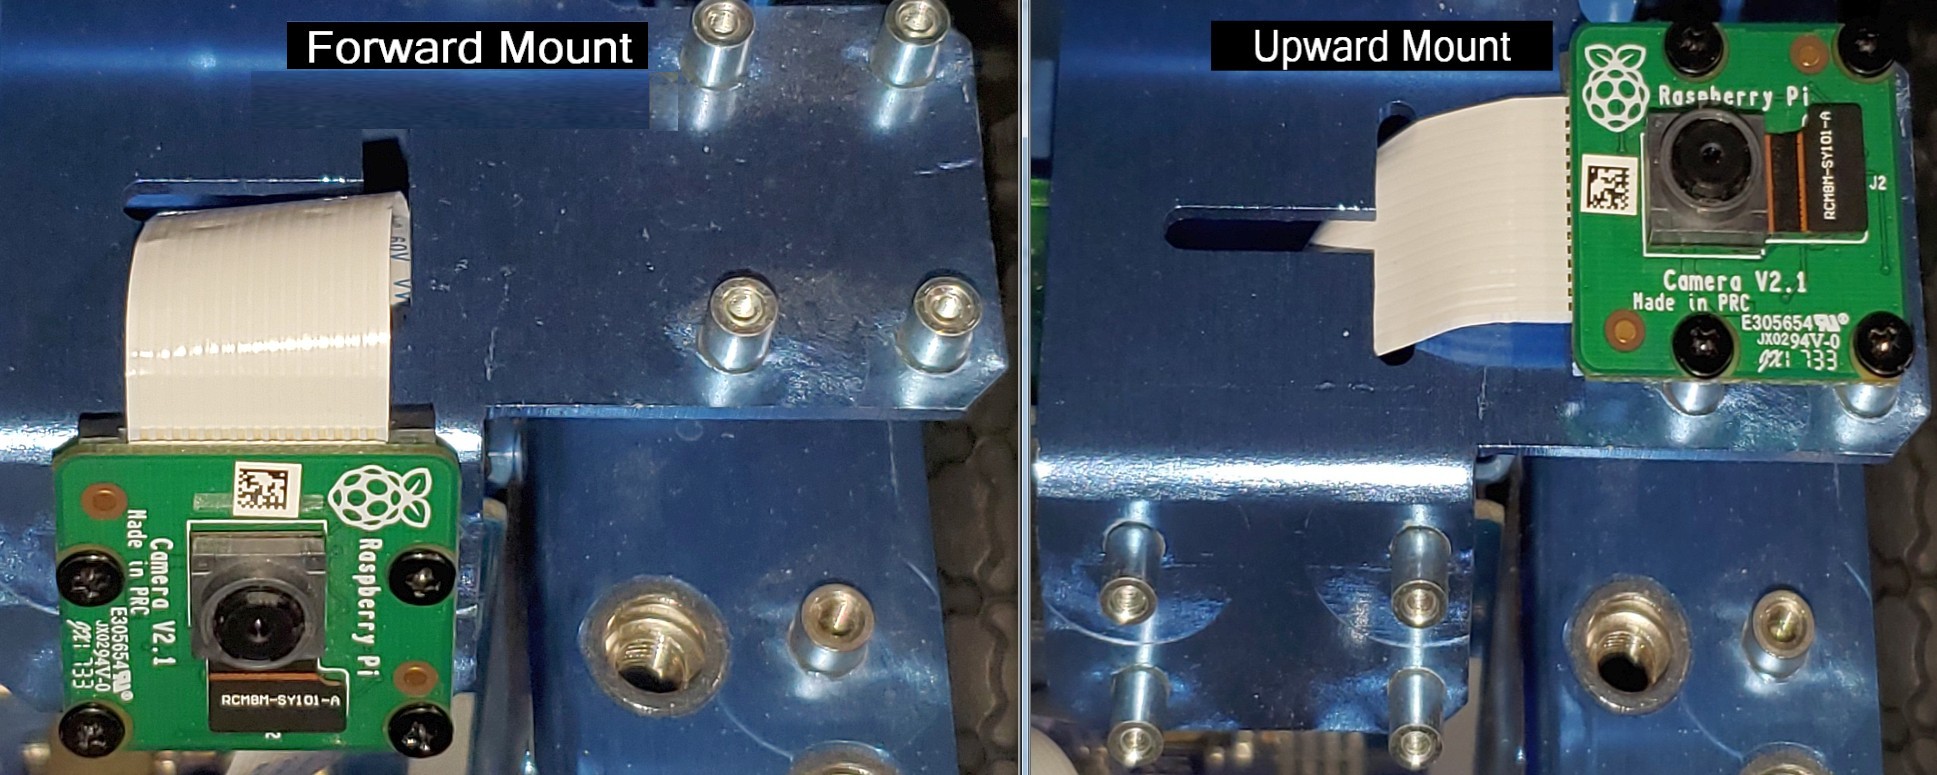
Notice that in both orientations that the cable was routed through the slots in the metal bracket. The camera is screwed to fixed standoffs using M2 screws 3 or 4mm in length. The white side of the flat cable is towards the top of the board and below there is a blue piece of tape on the cable. The cable must be inserted as shown in order to properly connect the camera. Make sure the cable goes all the way in as it can seem to be in but not fully making contact.
The Magni software must be configured to set usage of any camera mounting other than the forward configuration. If
you for example use the upward facing camera you must edit the
/etc/ubiquity/robot.yaml file as root user and change the line for the raspicam
orientation.
sudo nano /etc/ubiquity/robot.yaml
The line would be as shown below and a reboot of the robot is required. There must be a space between the colon and the left bracket.
raspicam: {'position':'upward'}
Take care when removing the pi to gently rock it back and forth after unscrewing it's screw that goes into a standoff on the main board. BE CAREFUL TO AVOID application of ANY PRESSURE to the very thin Micro SD card inserted in the right side of the Pi because it sticks out. It is very easy to break the SD card in this process if your fingers push on the SD card.
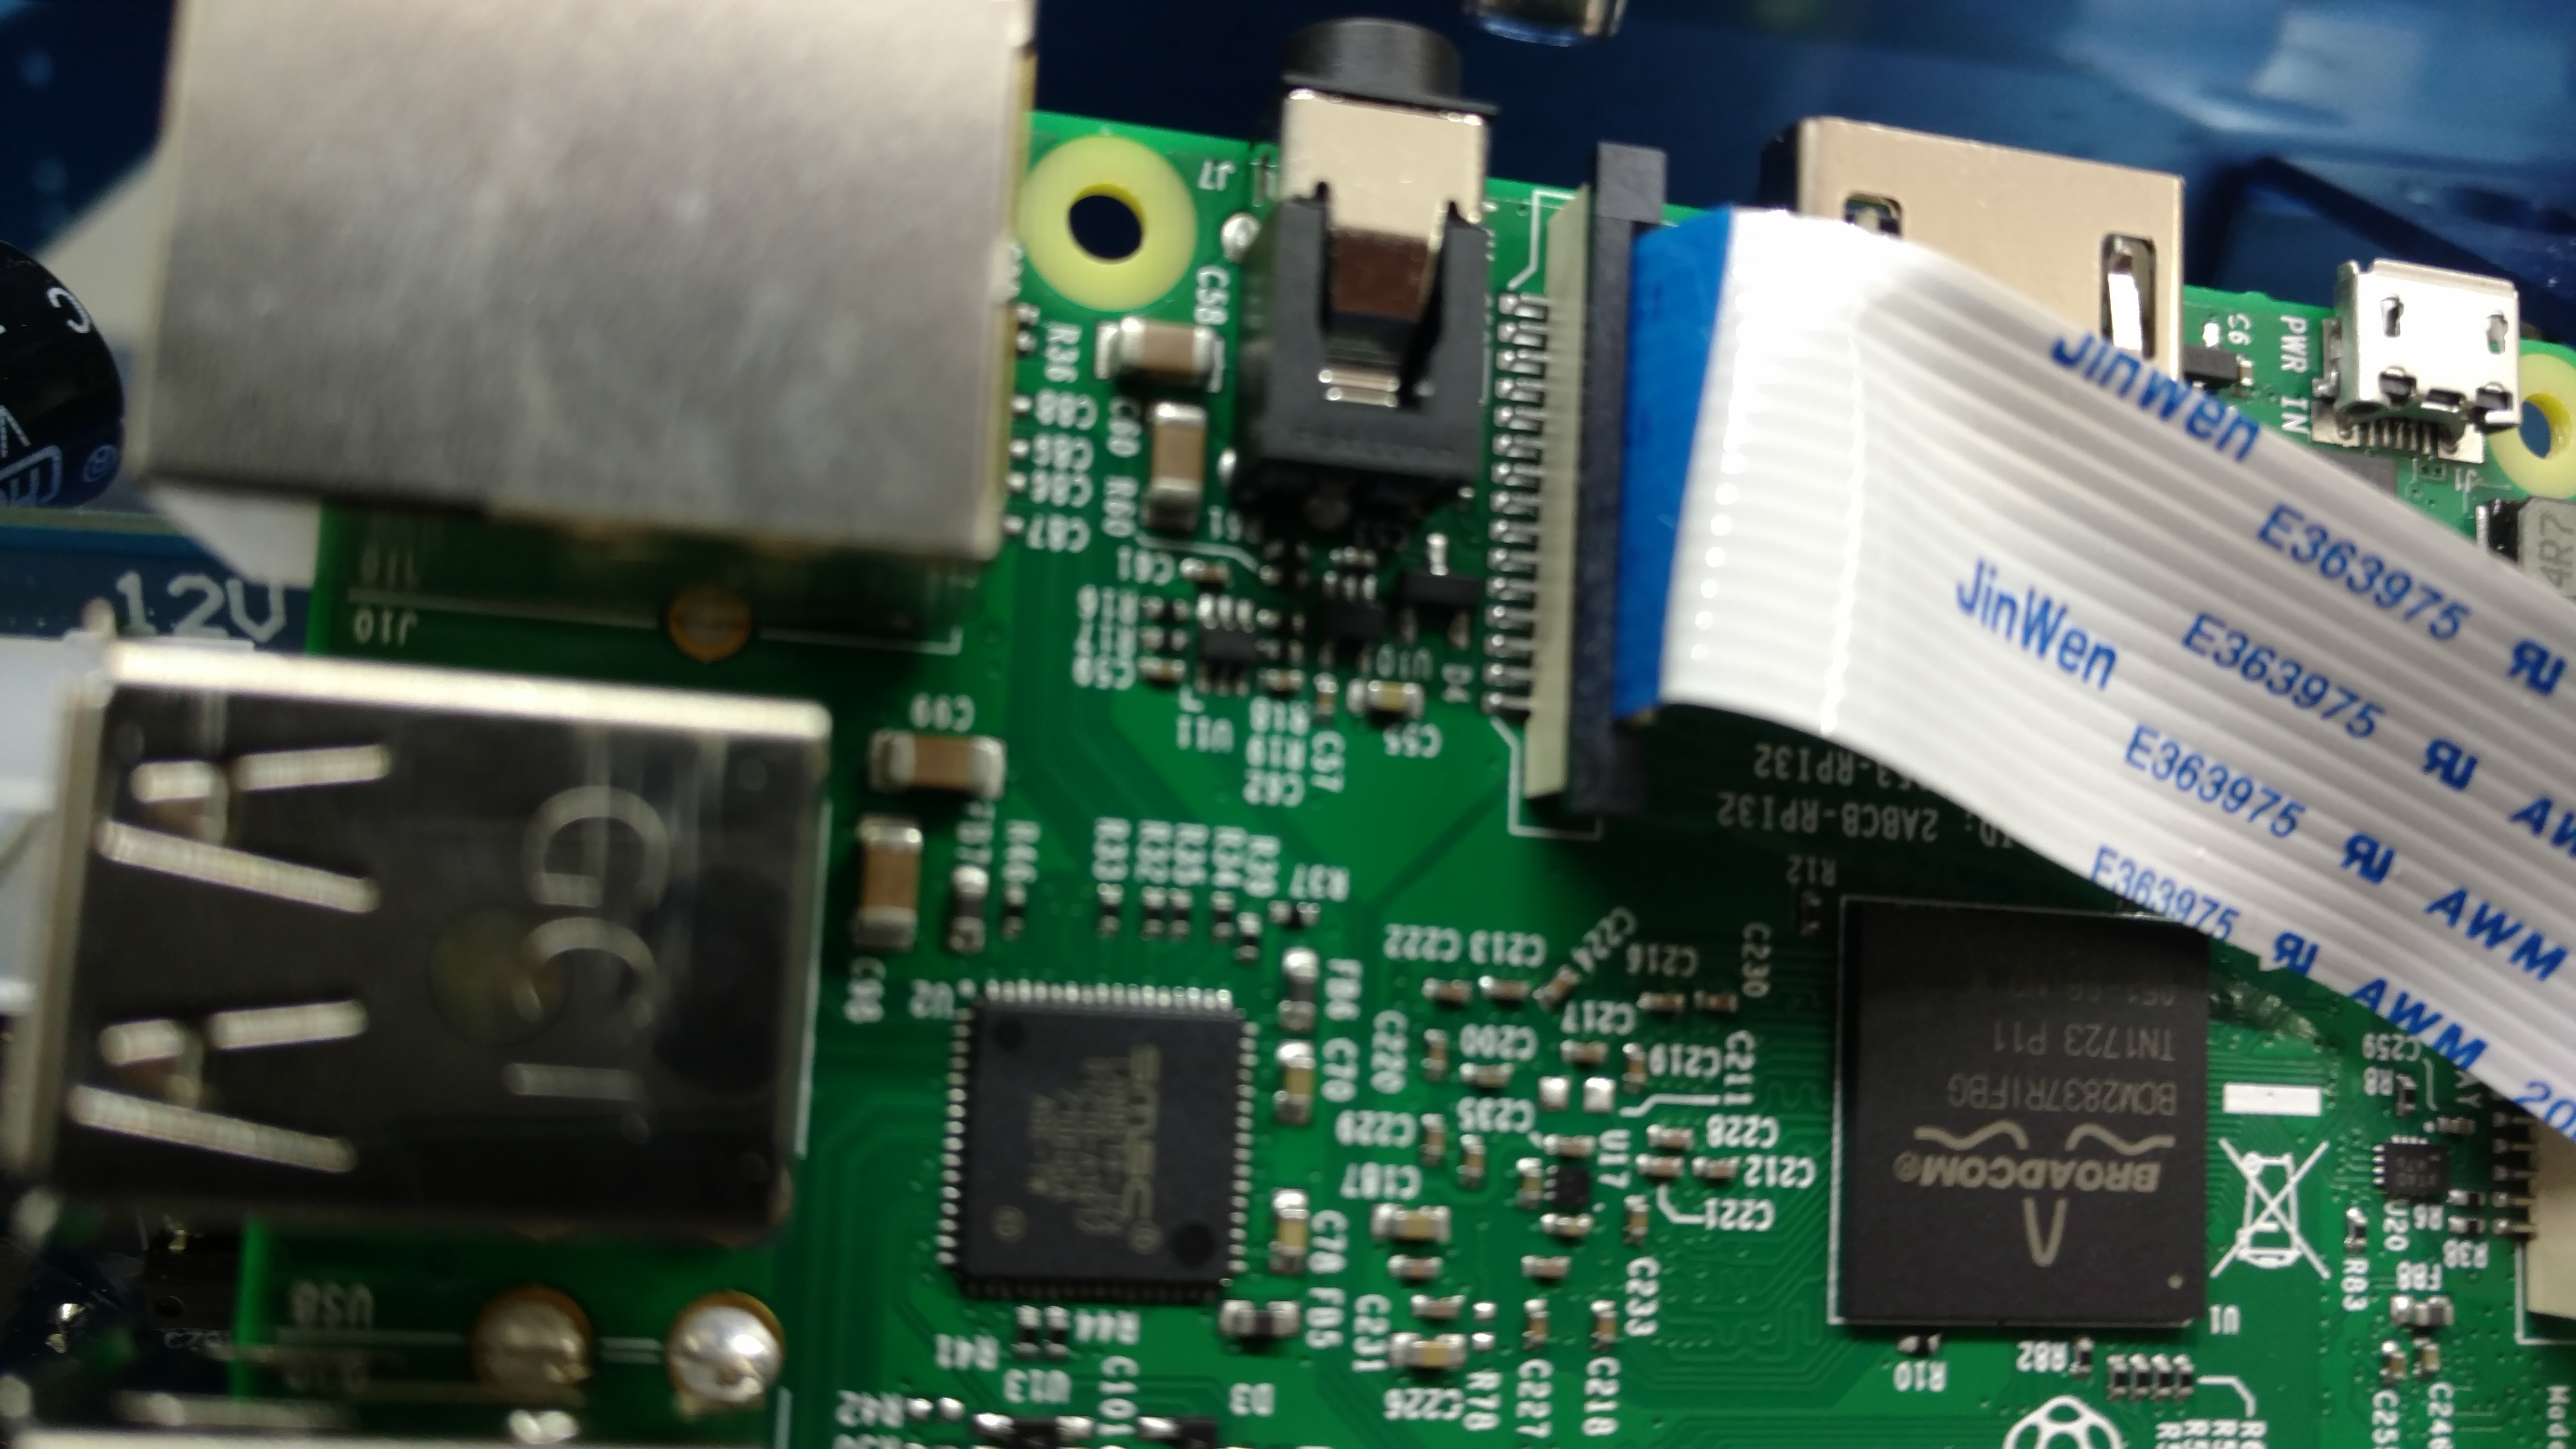
Next attach the cable to the Pi; the ‘blue’ part of the cable faces toward the USB ports. Make sure the cable goes all the way in as it can seem to be inserted but not fully making contact.
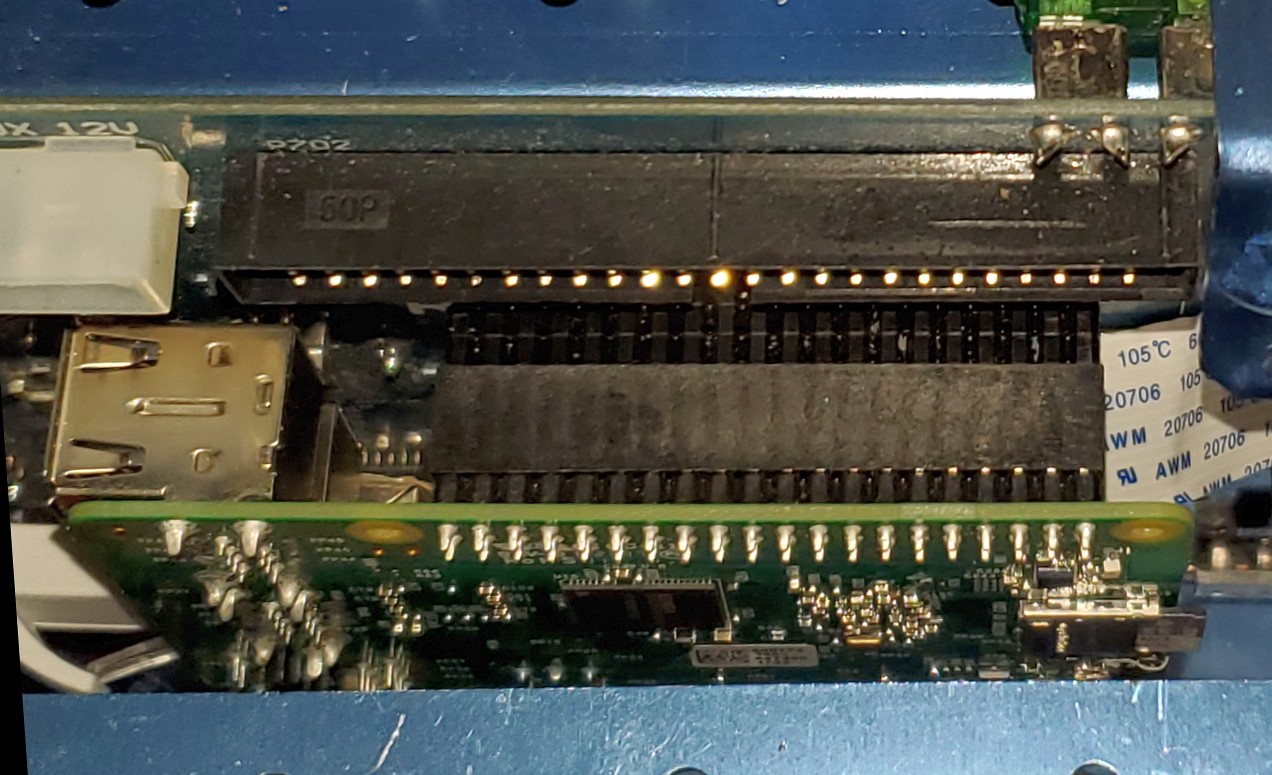
Next reinstall the Pi, making sure the pins are aligned correctly as in the picture below. (Misaligned pins will cause permanent failure!)
Testing
If you find that fiducial follow or waypoint navigation launch files have errors early on for the camera, you may want quick way to test the camera. You can first open an ssh session to the robot and then try the following command:
raspistill -o test.jpg
If you don’t get an error message, you have a good camera. An (mmal) error message indicates the camera is not being detected by the Raspberry Pi, this is usually due to a poor cable connection or less likely a bad camera.
If you have a laptop running ROS where the robot is the ROS master then you may have or want to install image_view on the laptop to see the camera output fairly easily. Briefly if image_view is on your laptop and configured use this:
rosrun image_view image_view image:=/raspicam_node/image
If you know how to use rviz on the laptop that too can be configured to show you the camera image but that is a bit more complex.
Calibration
Sometimes for best performance or certainly if a different type of camera than the robot has from the factory you may want or need to do a camera calibration. The calibration is used to flatten the field. All camera lenses introduce optical distortion some people refer to as fish eye distortion. The shorter the focal length the greater the field of view but along with that comes greater fish eye distortion.
To perform this calibration please see our ‘Calibration’ section in the readme in our raspicam github repository where we explain that our camera must be running the raspicam node and publishing raw camera data. Then on a laptop setup as a ROS node where the robot is the ROS master a camera_callibrator program is run.
The link above will point to a ROS calibration process that is used for the calibration itself once our raspicam node is publishing images. One thing that can surprise people is after it has been indicated the program has enough data to do the calibration you will click the ‘Calibrate’ button. What happens then can take a great many minutes to complete and it appears that the camera_callibrator program is hung up but in fact it has to do a great many calculations so give it time.
The ROS page with calibration is the Monocular Calibration Page
Using A Different CSI Camera
The robot ships with a Raspicam v2.1 which has a fixed lens suitable for many of the uses for the robot such as fiducial applications and viewing where the robot is heading.
Using a different camera is very infolved so this section has been written to help guide those who need a better or different camera than the Raspicam v2.1
This section will explain what sort of steps must take place to use a different camera that is compatible with the Raspberry Pi standard flat cable interface, the CSI-2 interface. A short list of the things that will be required is presented then some details that will focus on the 2020 new camera called the RaspicamHQ using a 6mm lens. Any different camera will require hardware and software as well as config file changes.
Decide on a camera name and stick with this name as it will appear in files and as parts of file names to help you keep the many references less confusing. We will in this example use camerahq6mm_2048x1520
We consider a given camera with a given lens as one camera so if you use something like a RaspicamHQ with a 6mm lens, that is one camera config.
1) An adapter to physically mount the camera and connect flat cable
2) A camera calibration file created for this camera and lens
3) Possible changes to the URDF file for location of the camera
4) Changes to any launch files to start apps using this camera
Physically Mounting The Camera To The robot
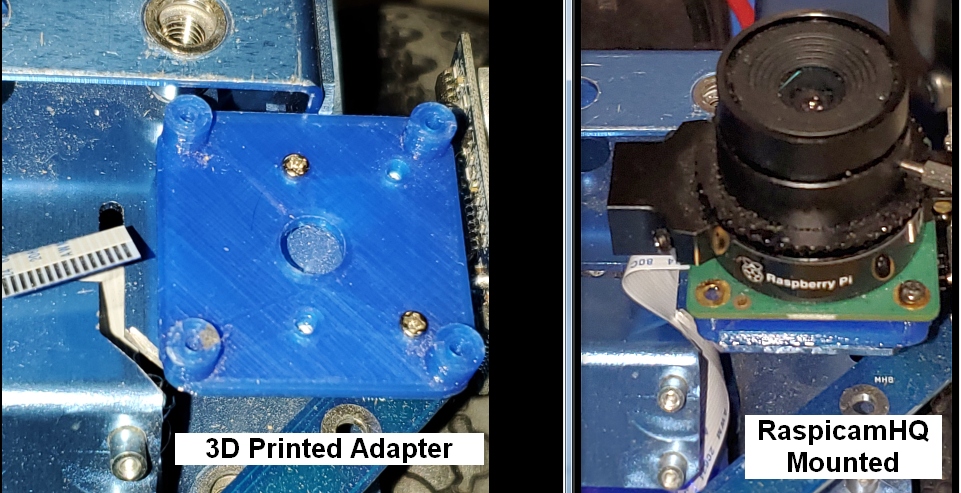
In the simple case a 3D printed part that attaches to the existing Magni robot camera standoffs can be used. We have done this with at least 2 cameras incuding the RaspicamHQ camera. Below is shown the 3D printed adapter by itself and then the RaspicamHQ mounted to the adapter.
Camera Calibration File Must Be created
You will need to create a camera calibration file per instructions above in ‘Camera Calibration’ section. We suggest you give it a name that indicates the camera type, the lens being used and the camera resolution. For our example here lets say we call this file camerahq6mm_2048x1520.yaml.
For this example we will set ‘camera_name’ in this file to be camerahq6mm_2048x1520 and you will need to remember this for later in other files to be modified.
The camera calibration files are normally placed in /home/ubuntu/.ros/camera_info so you can put it there along with other cal files.
In some cases you may need this config file also in another default location so put it in both places and modify it both places later as required to avoid having to know the exact reasons each location may be used. The other folder is /opt/ros/$ROS_DISTRO/share/raspicam_node/camera_info
Possible Changes To The URDF file
The URDF file is a file that defines where physically each part of the robot is relative to the main ‘origin’ of the robot which is called base_link. If you are not requiring precise navigation and can live with errors due to camera placement that are only a cm more or so we suggest you not modify the URDF file as this can be an advanced task.
The default path to the Magni URDF file, which you should backup for sure if you are going to try to change it, is this path /opt/ros/$ROS_DISTRO/share/magni_description/urdf/magni.urdf.xacro
Seek assistance and plan on taking some time to change this but if you do then note that all the things that are likely to change are in one or more sub-sections of that file with the word ‘raspicam_mount’ and the values to be changed will be the center of the camera as ‘origin xyz’ and then ‘rpy’ which is a 3D space rotational notation too complex for this brief discussion.
Changes To Launch Files That Will Need The Camera
This is the most involved of all the changes because it spans many launch files. We suggest you use names in these files that are like the calibration file so you can keep track with minimal confusion. For that reason I will use names that contain camerahq6mm_2048x1520 in the very brief coverage of files and pieces of those files that are likely to be used for the camera to use fiducials for navigation.
I will be mentioning file paths assuming you have not cloned Ubiquity Robotics folders that are for fiducial navigation be because if you do that the files to be created or modified will be in your catkin_ws space.
- Create a new launch file to specify the camera, resolution and frame rate where for example we can call it
camerahq6mm_2048x1520_10fps.launchand this file would by default be located in/opt/ros/$ROS_DISTRO/share/raspicam_node/launchfolder. You may want to copy over an existing file such as camerav2_1280x960_10fps.launch and give the copy this new name then modify it.
Be aware that near the top the parameter camera_name must be the name that is used inside the config file which in this example was going to be
-
A very similar file in the same folder is sometimes needed so create in
/opt/ros/$ROS_DISTRO/share/raspicam_node/launchthis similar file where you can copy over the existing camerav2_1280x960.launch to formcamerahq6mm_2048x1520.launchthen edit this file to customize it for your new camera. -
For fiducial recognition we use a package called aruco. You will need to perhaps save a copy of aruco.launch to aruco_old.launch and edit the file
/opt/ros/$ROS_DISTRO/share/magni_nav/launch/aruco.launchso that instead of references to original camera has new camera. You must modify the line near the top that has default camerav2_1280x960_10fps.launch in it and use your new launch file which for this example we calledcamerahq6mm_2048x1520_10fps.launch
Extra: USB Cameras
As the Raspberry Pi has 4 free USB ports, you can also attach most off-the-shelf webcams and set up the usb_cam ROS node to act as a generic driver.
When your camera is plugged in, run ls /dev | grep ttyUSB to see which USB devices are attached, if you’re only using one camera it’ll likely be /dev/ttyUSB0, which you can then add to the usb_cam launch file as the video_device param.